Free info about software

Wednesday, April 19, 2017

Find Your Missing USB Drive in Windows 7, 8, and 10


USB drives should automatically appear in Windows Explorer when you connect them to your computer. Follow these troubleshooting steps if Windows doesn’t show a connected drive.

Diagnosing the Problem


If you connected a USB drive and Windows doesn’t show up in the file manager, you should first check the Disk Management window.
To open Disk Management on Windows 8 or 10, right-click the Start button and select “Disk Management”. On Windows 7, press Windows+R to open the Run dialog, type diskmgmt.msc into it, and press Enter.


Examine the list of disks in the disk management window and look for your external drive. Even if it doesn’t show up in Windows Explorer, it should appear here. Look for a disk that matches the size of your flash drive. Sometimes, it’ll also be marked as “Removable”, but not always.
In the screenshot below, we’ve spotted our removable drive at “Disk 3”. If you see yours, move onto the next section.


If you don’t see the drive in the Disk Management window at all, try these troubleshooting steps:
  • Power On the Drive, if Necessary: Some external hard drives have their own power switches or separate power cables. If you’re using a larger drive, ensure it doesn’t have its own power switch or power cable you need to connect.
  • Plug It Into a Different USB Port: Try unplugging the external drive and plugging it into a different USB port on your computer. It’s possible that one particular USB port on the computer is dead.
  • Avoid USB Hubs: If you’re plugging the USB drive into a USB hub, try plugging it directly into one of your computer’s USB ports instead. It’s possible the USB hub doesn’t supply enough power.
  • Try a Different Computer: Try plugging the USB drive into a different computer and see if the other computer detects it. If no computers see the drive when you connect it–even in the Disk Management window–the USB drive itself is likely dead.
Hopefully, one of these will solve your problem. If not, move onto the fixes outlined below.

Fixing the Problem

Once you’ve performed the above steps, you’re in a better place to fix the problem. Here are a few possible solutions based on what you found when searching for the drive in Disk Management.

If Windows Asks You to Format the Partition When You Insert It

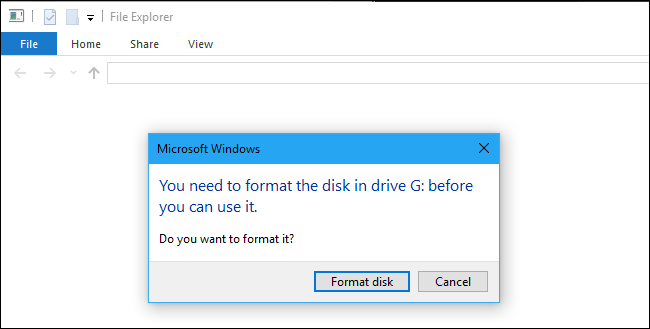
If Windows can see the drive but can’t read it, it’s possible the drive was formatted with a file system Windows doesn’t normally support. For example, this can occur if you format a drive with the HFS+ file system on a Mac or with the ext4 file system on a Linux PC.
If you connect a drive with a foreign file system, Windows will tell you it needs format the drive before it can use it. Don’t format the disk yet! This will erase any files on the disk. If you don’t need the files on the disk, you can agree to format it–but be sure the drive doesn’t have any important files on it before you do.


To read a drive like this one, you can either connect it to the Mac or Linux PC it was made on, and copy your files off of it onto another drive. Alternatively, you can use software that lets you read Mac or Linux file systems in Windows. After you copy the files off the drive, you can agree to let Windows format (erase) the disk. It will appear as an empty drive that is now compatible with Windows.

If Other Windows PCs Can See the Drive, But Your Current One Can’t

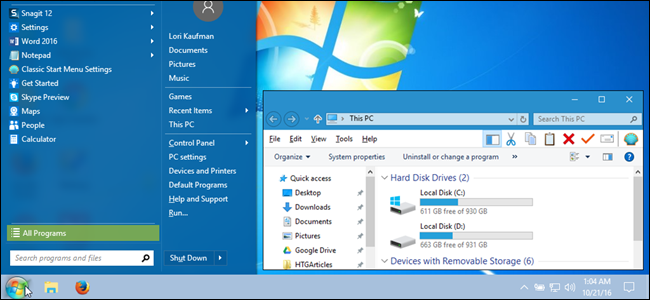
If other computers detect the drive when you plug it in, but your current computer doesn’t, it’s possible there’s a driver problem in Windows.
To check for this, open the Device Manager. On Windows 8 or 10, right-click the Start button and select “Device Manager”. On Windows 7, press Windows+R, type devmgmt.msc into the Run dialog, and press Enter.

Expand the “Disk Drives” and “USB Serial Bus controllers” sections and look for any devices with a yellow exclamation mark on their icon. If you see a device with an error icon, right-click it and select “Properties”. You’ll see an error message with more information. Search the web for this error message to find more information.


To fix driver problems, you may want to right-click the device, choose Properties, and head to the Driver tab. Use the “Update Driver” button to attempt to install an updated driver, click “Roll Back Driver” to roll back the driver to a previous one if it just stopped working, or use the “Uninstall” button to uninstall the driver and hope Windows automatically reinstalls one that will work.


If You See the Drive in Disk Management, and It Has Partitions

If the drive appears in Disk Management and you see one or more partitions on the drive–with a blue bar along the top–it may not be appearing in Windows Explorer because it needs to be assigned drive letters.
To do this, right-click the partition on the drive in Disk Management and select “Change Drive Letter and Paths”. If you can’t click “Change Drive Letter and Paths”, that’s because Windows doesn’t support the file system on the partition–see below for more information.


You may see that the partition has no drive letter assigned to it. Assign a driver letter and it should just work.
To assign a drive letter, click the “Add” button and assign a drive letter of your choice to the drive. Click “OK’ and it will appear in File Explorer or Windows Explorer with that drive letter.


If You See the Drive in Disk Management, But It’s Empty

If you see the drive in Disk Management, but it’s “Unallocated”, with a black bar along the top, this means that the drive is completely empty and unformatted. To format it, so Windows can use it, just right-click the unallocated space in Disk Management and select “New Simple Volume”.

Choose the maximum possible size for the partition and assign a drive letter–you can let Windows automatically choose a drive letter. If you want the drive to be compatible with as many other operating system and devices as possible, format it with the exFAT file system when Windows asks. Otherwise, if you’re only using it on Windows machines, NTFS is fine. After it’s done, the drive should be usable.


If You See the Drive in Disk Management, But You Can’t Format It

In some cases, the drive may have a very messy partition scheme. You may even see “protected” partitions that you can’t delete from within Disk Management. Or, the partition on the drive may be too small because the drive has protected partitions wasting space on it.
You can “clean” the drive to clean up that mess, wiping all the files and partition information from the drive and making it usable once more. First, back up any important data on the drive if the drive has important data on it. The cleaning process will wipe the drive.

To clean the drive, you’ll need to open a Command Prompt window as Administrator and use the diskpart command to “clean” the appropriate drive. Follow our step-by-step instructions to cleaning a drive in Windows for more information. You can then create partitions on the empty drive.


With any luck, after following these steps, your drive will be in good working condition again.


Share:

Disable Windows 10’s Taskbar Pop-up Notifications


Microsoft is now more aggressively pushing taskbar and action center ads some for Microsoft Edge, some for other Microsoft products. These are just one of the many types of advertising in Windows 10. Here’s how to make it stop nagging you.

Windows 10’s taskbar pop-ups are implemented differently from those Get Office notifications. They’re not generated by the app they’re advertising for, like Edge. Instead, they’re generated by the Windows operating system itself. You can’t just disable those notifications like you would for the Get Office app.
You’ll find this setting in the Settings app. Open the Start menu and click the Settings icon to launch it.


Navigate to System > Notifications & Actions in the Settings app.
Scroll down to the Notifications section and disable the “Get tips, tricks, and suggestions as you use Windows” option.


That’s it. Windows won’t notify you with these “tips, tricks and suggestions” any longer.
Share:

Monday, April 10, 2017

Make Windows 10 Look and Act More Like Windows 7

00_lead_image_windows_10_as_windows_7
If you’ve upgraded to Windows 10 but don’t love what you see, there are ways to make Windows 10 look and act like Windows 7. That way, you can get the familiar interface you love while still taking advantage of Windows 10’s other useful features.

Get a Windows 7-like Start Menu with Classic Shell

Microsoft sort of brought the Start menu back in Windows 10, but it’s been given a big overhaul. If you truly want the Windows 7 Start menu back, install the free program Classic Shell. You can even download images of the Windows 7 Start orb and use that on the Taskbar for the Start menu. Not only is it more similar to Windows 7’s start menu, but it’s insanely customizable, so you can get the Start menu of your dreams.
There are a lot of changes in Windows 10’s File Explorer compared to Windows 7’s Windows Explorer. If you’re not happy with the changes, you can get the look and feel of Windows 7’s Windows Explorer back with a free tool called OldNewExplorer, along with some tweaks to the settings and registry that get rid of the ribbon, hide Quick Access, and lots more. Check out our full guide for all the tweaks.

Add Color to the Window Title Bars

The title bars on windows in Windows 10 are white by default. But that’s boring! Thankfully, the latest version of Windows 10 lets you add some color to the title bars in the settings, letting you make your desktop a little more like Windows 7. Just head to Settings > Personalization > Colors to change them. You can read more about the color settings here.

Remove the Cortana Box and Task View Button from the Taskbar

06_search_and_task_view_buttons_hidden
The Windows 7 Start menu included a Search box right on the menu. In Windows 10, that search box was moved to the Taskbar and integrated into Cortana (personal assistant) and the Task View (virtual desktops) button was added to the Taskbar as well. Neither Cortana nor Task View was available in Windows 7. So, to continue our conversion to a Windows 7-like experience, you can remove both of them from the Taskbar–you just need to right-click on the taskbar. De-select “Show Task View Button” and go to Cortana > Hidden.

Disable the Action Center

wpn_top_2
The Action Center is a new feature of Windows 10 that’s available by clicking the message bubble on the right side of the Taskbar. It’s handy for seeing all recent notifications you might have missed, and frankly, we think it’s worth keeping–it’s one of the more useful updates to Windows 10. But, if you really want to get rid of it,  you can disable the Action Center by going to Settings > System > Notifications & Actions and clicking “Turn System Icons On or Off”. From there you can turn Action Center off with a simple slider.
You will still see popup notifications above your system tray. You just won’t be able to view them after the fact if you miss them.

Log In with a Local Account Instead of a Microsoft Account

As of Windows 8, your Windows account is tied to your Microsoft account by default, which means you log in to your computer with your Microsoft email and password. If you want to return to using a local account, like you did in Windows 7, you can revert your Windows 10 account to a local one using these instructions. You can also create a new local account that isn’t tied to your Microsoft account, if you prefer.

Play Games like Solitaire and Minesweeper Without Ads

Windows 7’s ever-popular free games, such as Solitaire and Minesweeper, were removed in Windows 8. Windows 10 includes the Microsoft Solitaire Collection app, but the game will show you banner ads and full-screen video advertisements, bugging you for $20 per year to get the ad-free versions. Thankfully, there are plenty of free (and ad-free) versions of these popular games out there. Check out this guide for a few of our favorites.

Disable the Lock Screen (on Windows 10 Enterprise)

08_lock_screen
The lock screen is pretty, but is really more of a touch screen-friendly feature. It isn’t really necessary or particularly useful on the desktop. It used to be the case if you were using any version of Windows 10, you could disable the lock screen. However, as of the Anniversary Update of Windows 10, you can only disable the lock screen if you are using Windows 10 Enterprise. So, if you’re using any other version of Windows 10, you’re stuck with the lock screen for now.

Easily Access the Classic Personalization Window

By default, when you right-click on the Windows 10 desktop and select Personalize, you are taken to the new Personalization section in PC Settings. However, the Personalization window from Windows 7 is still available in the Control Panel. You can add a shortcut to the desktop so you can quickly access the classic Personalization window if you prefer it.
Right-click on the desktop and select New > Folder from the popup menu.
10_creating_new_folder
Copy and paste the following text into the name of the folder and press Enter.
Personalization.{ED834ED6-4B5A-4bfe-8F11-A626DCB6A921}
11_pasting_name_of_folder
The icon changes to the personalization icon and the name of the folder also changes to Personalization. Double-click this icon to access the classic Personalization window in the Control Panel.
12_personalization_icon
It isn’t as good as right-clicking, but at least you have a quick shortcut now.

Set the Windows 7 Wallpaper as Your Desktop Background

Last, but certainly not least, you can change the desktop background to the classic Windows 7 wallpaper. You can grab it right here–just right-click on the image and save it somewhere on your computer. Then, right-click on the image in File Explorer and choose “Set as Desktop Background.”
13_set_as_desktop_background
Now, you can pretend that you never upgraded to Windows 10, at least until Microsoft forces Windows 10 updates down your throat.
Share:

Popular Posts

Powered by Blogger.