Free info about software

Wednesday, March 8, 2017

Save Money with the Walmart App’s Savings Catcher


Walmart has billed itself as the low-price leader online store,and they are usually hard to beat…but they don’t always have the lowest prices. Using the Walmart app is a great way to “catch” them when they don’t.
The Walmart app’s Savings Catcher is, essentially, a price matching tool. After you shop at Walmart, you can scan your receipt with the app, and it will “scan circulars from top competitors in your area” for the same items you bought. If it finds a store offering an item for a lower price than you paid, Walmart will refund the difference to you.
These refunds come in the form of an “eGift Card” that you can use on your next purchase at any Walmart or Sam’s Club location.
You might be surprised just how quickly things add up.

How to Scan Your Receipts with the Walmart Savings Catcher

First, download the Walmart app for Android or the iPhone. Create an account if you don’t have one…


…or sign in if you do.


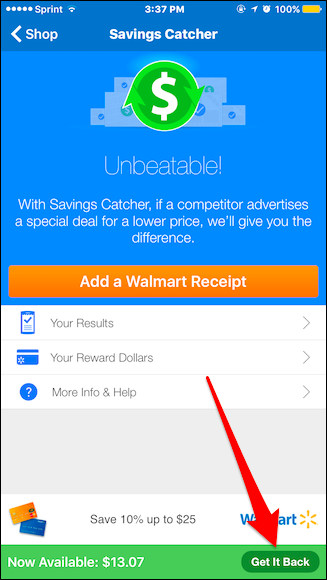
After you sign in, tap “Savings Catcher” on the Shop tab.


Tap “Add a Walmart Receipt”.


Scan the QR code on your receipt. If there isn’t a QR code, scan the barcode. If the barcode won’t scan, you can enter it manually by tapping “Type Receipt Info”.
NOTE: you must scan your receipt(s) within seven days of shopping at Walmart and you can only submit seven receipts per week!


Once you scan your receipt, you will receive an email letting you know that Walmart has received it and they are validating it.


If they find a lower price, you will receive another email letting you know how many “Reward Dollars” you’re getting back.


Any Reward Dollars you get back are automatically added to the Savings Catcher. Once you have available, unclaimed funds, you can generate an eGift Card to spend at any Walmart or Sam’s Club location (although you can only scan Walmart receipts).
To do this, tap “Get It Back” in the lower-right corner.


On the Get It Back screen, tap “Transfer to eGift Card”.


Once you do this, you will receive an email—usually within 24 hours—confirming your new Savings Catcher eGift Card is ready.


Next time you visit a Walmart or Sam’s Club, just present the email at checkout and the cashier will scan it, or select “Gift Card” when you’re checking out online. Your eGift Card funds will be deducted from your purchase.


Here are several more things to keep in mind:
  • You don’t have to spend your entire eGift Card balance in one go. Any remaining funds will remain on the eGift Card. You can repeatedly use the eGift Card email until it hits zero.
  • You don’t have to transfer any accumulated money the Saving Catcher finds to an eGift Card right away. Instead, you can let it accumulate and tap “Get It Back” when you’re ready to redeem it.
  • When you do tap “Get It Back” however, you will need to wait for Walmart to generate a new eGift Card and send you a confirmation email. Make sure to plan ahead so you have those funds available before your next shop.
That’s the basic rundown on how to use the Savings Catcher, and if that’s all you ever do with it, you will be saving money in no time.

How to View Your Rewards Dollars, Shopping History, and eReceipts

If you want to go back and see previous scanned receipts and reward dollars, you can do so from the app.
To see a total of how much you’ve been refunded, tap on “Your Reward Dollars”.


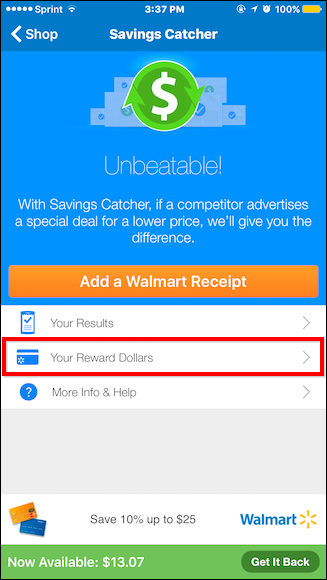
The Your Reward Dollars screen shows you how much money you have earned and redeemed since opening your account, as well as how much you have available.


Next, tap “Your Results”.

On the Your Results screen, you can scroll through and see your shopping history using the Savings Catcher.


Tap on any result to see the Results Details, where you can view a detailed list of what you purchased, how much you paid, and what each item cost. If any receipt is pending, it will show you that as well.


If a lower price was found from a scanned receipt, it will show you what that item was and how much you got back.
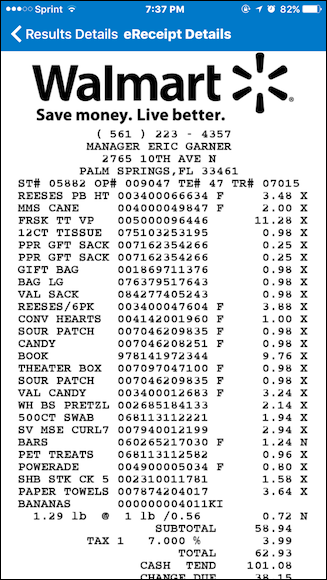
Tap the little icon in the upper-right corner to view your eReceipt.


The eReceipt is an electronic copy of your receipt. This can be useful if, for example, you lose the original paper receipt and need to present a copy for reimbursement or perhaps to itemize deductions on your taxes.


As long as you remember to scan your receipts within seven days, the Savings Catcher can net you quite a chunk of change over the long run. If your goal is to stretch your money as far as it will go, it’s definitely a great tool to have at your disposal.
Share:

Sunday, March 5, 2017

How to Download Movies From Netflix for Offline


After years of being on people’s wish lists, Netflix has finally webex costs cash advance started rolling its most oft-desired feature: the ability to download movies and shows for offline viewing. For the time being, this option is only available on mobile devices smartphones and tablets that run iOS and Android but you can start using it now.

This means a couple of things: you can watch Netflix on the go without eating up your data recovery service, and you can watch your favorite shows or movies while on a plane or subway with no data connection.

Of course, there are caveats, too. Firstly, the option to download movies or shows isn’t available for the entire Netflix catalog yet, but rather a specifically curated subset. A large part of the offline catalog includes Netflix original shows (which, let’s be honest here, is some of the best stuff on Netflix anyway), along with some other select titles. I imagine the selection will continuously change, which should keep things fresh.

So, how do you get this new feature? It’s actually incredibly easy.
The first thing you need to do is make sure you have the latest version of the Netflix app on your respective device. These things often become available in staged rollouts, so if it’s not yet available on your account, you can wait a few days, or in the case of Android, at least find the APK and sideload it.

Once you have the app installed, it will be quick to let you know about the new feature as soon as you open it up. Front and center, baby.


You can always select “Find something to download” to get started, but if you happen to navigate away from that window, you can also open the menu by swiping in from the left side and selecting  “Available for download.” This will show the entire offline catalog.


Before you start going download crazy, however, you should be aware of some of the new settings regarding downloads. You can choose to only download content on Wi-Fi (which is highly recommended, and on by default), as well as what quality to download. Unfortunately, Netflix isn’t very straightforward with the options, just “Standard” and “High.”


As you can probably assume, Standard will take up less space, where High will eat up more. On my Pixel C, I could definitely see pixelation and artifacting with the “Standard” setting, but things cleared up quite a bit with “High.” I’m going to go out on a limb and guess that the latter is 720p, but there’s no documentation that directly states this.
The first time you open a title that has the download option available, Netflix will kindly let you know with a small popup.


Even after that window is gone, however, grabbing a show or movie is super easy: tap the download button right next to the episode name or below the movie description.


When the download starts, a progress bar will show up at the bottom of the screen. When it’s finished, a notification will appear letting you know it’s ready to go. On Android, you’ll also get a notification in the shade.


To access your downloaded content, slide the menu open (again, sliding in from the left) and select “My Downloads.”


Movies will start playing as soon as you tap the entry, where shows will open a list of everything you’ve downloaded from that series. Tap on one of those entries to play it.


When you’re ready to delete an item, tap the icon in the upper right corner (on the My Downloads page) it’s a pencil on Android, and reads “Edit” on iOS.


On Android, check boxes will show up next to the downloaded content tap those boxes for the entries you’d like to remove.


On iOS, red Xs will show up next to the titles. Tap the X to remove the download.


Alternatively, if you’d like to remove all downloaded content, you can head back into the Settings menu by sliding in from the left and scrolling down to “App Settings,” then tapping the “Delete All Downloads” button.


And there you have it: Netflix’s new offline feature in a nutshell.
Share:

How to Play Mobile Legends: Bang bang In Computer Or Laptop


Mobile Legends Bang-Bang has the same features as the DOTA and LOL. Keep in mind, destroy the enemy tower is the top priority rather than killing the enemy for victory.
say plays mobile Legends: Bang bang in the computer certainly not difficult. 
Currently there are a variety lightest Android emulator that can be used to play Mobile Legends
on computers without obstacles or Lag.
Another advantage of playing Mobile Legends on your computer or laptop you are you do not need to fear
running out of battery on a smartphone, internet connection problems,and other things. 
Here are tips and tricks that will help you play Mobile Legends Bang Bang On your PC or Laptop:

 
Instal Nox For Play Mobile Legends 
 
 
  • Download Nox App Player and instal to your computer or laptop..
  • Instal Mobile Legends via Google Playstore.
  • After finish open mobile legends
How Setting Control Keyboard Mobile Legend in nox


  • Entry into a game Match Up, Ranked Game, Brawl Mode, or Custom Mode.
  • Next find menu keyboard control ( look Picture )

  • Drag pic no 2 costomize with control move 
  • Reset button other his suit your needs.


That's an easy way to install and how to play Mobile Legends: Bang bang
on the computer. For you who have recently tried to play on the PC.


Share:

Popular Posts

Powered by Blogger.